1.
From the Setup dropdown menu, choose the Schedules tab then click on Schedule.
The Schedule List page displays.
2. Click on the New Schedule
button. The New Schedule page
displays.
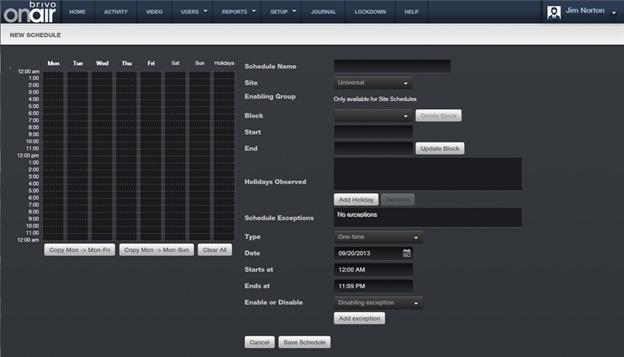
3. Enter a brief, descriptive name in the Schedule Name field.
4. You can create schedules to be used by the entire account or by
individual sites. If you want this schedule to apply only to a specific site,
click that option on the Site
dropdown list. Otherwise accept the default, Universal.
5. For site-specific schedules, you can define this as a Group
Enabled Schedule. When you select the site from the Site dropdown list, an Enabling
Group dropdown list displays. Select an Enabling Group and enter an associated Grace Period. Refer to the
Creating a Group Enabled Schedule section before assigning an enabling
group to any schedule.
|
|
WARNING: Group Enabled Schedules Group Enabled Schedules support Brivo Onair First-Person-In and
Supervisor-on-Site functionality. If you assign an enabling group to a
schedule without first understanding how this feature works you may
inadvertently create a security risk. Refer to the Creating a Group Enabled Schedule section before assigning an
enabling group to any schedule. |

6. If any holidays have been defined for the account, they will be
listed under Holidays Observed.
Click the Add Holiday link to call
up the holiday popup window. Select the holiday(s) that you want to be observed
by this schedule and then click the Close
Window link. If you wish to remove a holiday from the list, highlight the
holiday in question and click the Remove
link.
7. Draw blocks of time for which general access should be allowed.
8. To define an access period, click on a gray
column, drag up or down with your cursor, then release. As you drag, portions
of the column are highlighted, indicating a period during which general access
is allowed. When you release your cursor, the block snaps to the nearest hour.
9. To extend an access period, highlight the gray
area above or below the existing block. Make sure the new block touches the
existing block. When you release your cursor, the blocks merge together.
10. To adjust the access period to some fraction of
an hour, click the existing blue block once. The Block field displays the start
and end of the time period. Select the hour, minute and time of day from the
dropdown menu to adjust the start or stop time. When you have the time set
correctly, click Update Block.
11. To delete an access period, click once on the
blue block to select the time period, and then click Delete Block.
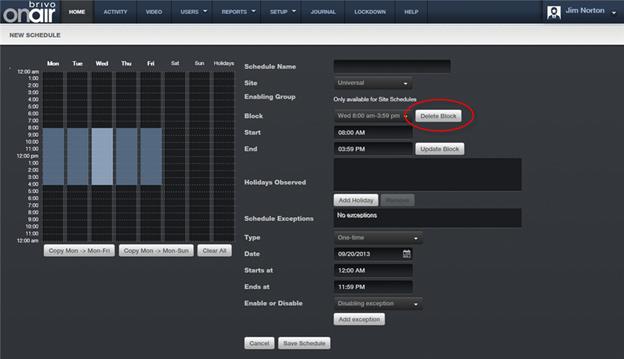
Figure 160. Delete Schedule Block
12. To repeat an access period for the work week or
the entire week, fill in the Monday column, and then click Copy Mon to Fri or Copy Mon to Sun.
13. To clear all access periods, click Clear
All.
14. To revert to the most recently saved settings,
click Revert.
|
|
NOTE: You must save a schedule first before choosing to Revert; if the schedule has not been
saved, clicking Revert will result
in returning to a blank schedule. |

|
|
NOTE: The maximum number of time periods per day is 32, with the
option to have a schedule block as short as one minute. A schedule is in effect only when it is applied to a group,
device or floor. |
15. A schedule refers to its Holiday
column during defined holiday periods. In the Holiday column, enter the general hours during which the door or
floor can be accessed or the device activated during the holiday periods for
this schedule. For example, you might have a schedule called “Work Day” that
allows general access from 8AM to 6PM Monday through Friday. But on holidays,
you want to limit access to 9AM to 1PM. For more information, see Creating a Holiday.
|
|
NOTE: If the Holiday column is left blank, no access will be permitted during
observed holidays. |
16. Schedule Exceptions allow an administrator to create a One-Time
Exception or Repeating Exceptions.
17. For One-Time Exceptions,
select whether or not it will be active during a normally closed portion of the
schedule (Enabling Exception) or to
be inactive during a normally open portion of the schedule (Disabling Exception). Then select the date from the popup calendar
and then select the time in the Starts
At: and Ends At: fields. Once
complete, click the Add Exception button
to add the One-Time Exception to the
Schedule Exceptions list.
18. For Repeating Exceptions,
select whether or not the exception will be to be active during a normally
closed portion of the schedule (Enabling
Exception) or to be inactive during a normally open portion of the schedule
(Disabling Exception). Repeated exceptions are based on a weekly
rotation, so select the 1st through the 5th, then the day
of the week, and finally the time of day in the Starts At: and Ends At: fields. Once complete, click the Add Exception button to add the Repeating Exception to the Schedule Exceptions List.
|
|
NOTE: Schedule Exceptions are only available to accounts with panels
that have firmware version 5.0.16 or later. An error message will appear
above the Schedule Exceptions box informing you if any of the panels on the
account have earlier firmware. |
19. Click Save Schedule.
The View Schedule page displays.