1.
Once the Salto Router is selected from
the Board and Node dropdown list,
the Lock field appears. Enter the
lock number for the new Salto door. If the lock number selected is unavailable,
a warning will appear in red.
2.
In the Enable Privacy Mode field, click Yes or No to indicate if
you want to enable Privacy Mode for this Salto Router.
3.
In the Enable Credential Caching field, click Enable or Disable to
indicate if you wish to enable credential caching for this Salto Router. If Enable is selected, enter the number of
days (1-30) in the Cached Credential
Buffer History field.
4.
In the Pass-through Period field,
enter the maximum length of time (1-600 seconds) the door should remain
unlocked after a user presents his or her credentials and is authenticated or
presses a Request-to-Exit switch. For example, if this value is set to 15, the
user has 15 seconds to pass through the door before it automatically re-locks.
The default setting is 5.
5.
In the Door Unlock Schedule field, click a schedule from the dropdown list
if you want the door to remain unlocked for pre-specified periods of time.
6.
In the Control from Browser field, click Yes or No to indicate if
you want to enable the Control from Browser feature to allow Unlock Door to function.
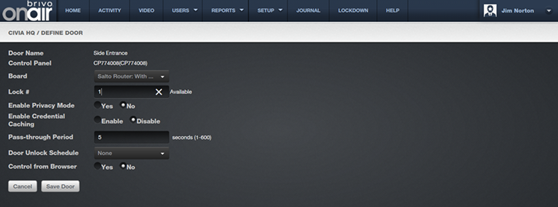
Figure 129. Define a Salto Door
7.
Click Save Door. The Door detail
page displays.
|
|
NOTE: The control panel firmware must be
version 5.0.22 or later for the Salto Wireless Door feature to utilize all
listed features. If the control panel
has firmware version 5.0.18 or earlier, the Salto Wireless Door feature is
not available. |
