From the Users tab,
click Users. The User List page
displays.
Click the New User
button. The New User page displays with the Identity tab.

Figure 44. Create a User – First Tab
Enter the user’s First Name, Middle Name, and Last Name.
Click the Save Identity button.
The User Profile page appears with the four tabs: Identity, Groups, Credentials, and Custom Fields.
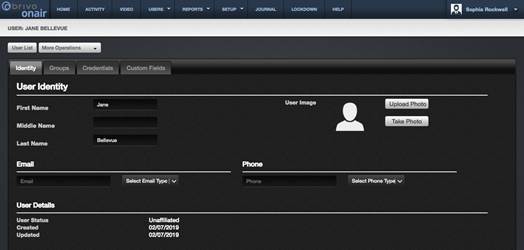
Figure 45. Create a User – Identity Tab
On the Identity tab, if
you want to associate an image with this user, click Upload Photo to upload an already existing image. The select image
popup window displays.
On the Identity tab, if
you want to associate an email address with the user, enter an email address in
the Email field and then select the
type of email (Home, Work, Other) from the dropdown menu. You may also type a
new email address type directly in the Select
Email Type field by clicking on it (for example, Vacation or San Diego
Office). Once you have entered the email address and selected the email type, a
green banner will appear across the top of the page notifying you that the
email(s) have been saved.
On the Identity tab, if
you want to associate a phone number with the user, enter a phone number in the
Phone field and then select the type
of phone (Home, Work, Mobile, Other) from the dropdown menu. You may also type
a new phone number type directly in the Select
Phone Type field by clicking on it (for example, San Diego Office). Once
you have entered the phone number and selected the phone type, a green banner
will appear across the top of the page notifying you that the phone number(s)
have been saved.
If you wish to take a new photo with a webcam, click on Take Photo. The Upload Image popup window displays. When you are ready, click on the Take Photo
button.

|
|
NOTE: The Brivo Onair webcam interface uses Adobe Flash. This program
must be loaded in order for the webcam to function. Additionally, the first
time the webcam is used, right click on the image area (which will be black)
and select Settings. Click the Allow button and the Remember checkbox and
Close. |

Follow the instructions to click and drag the mouse on the image
over the area you want to select for this photo. This allows the user to crop the photo to the
desired size.
When finished, click Save.
You are returned to the New User page with the user image displayed.
Click on the Groups tab
to move to the next step in Creating a User.
To assign a user to a group, click on the Choose link next to Add
Group and select the desired group(s) from the pop up window. When
finished, click on the X in the upper right hand corner of the popup window to
close the popup window. To remove a user from a group, click on the (–) symbol
next to the group in the list. Users can be assigned to up to 16 groups at a
time, and they inherit access privileges from the group(s) to which they
belong.

Figure 48. Create a User – Groups Tab
Click on the Credential tab
to move to the next step in Creating a User.
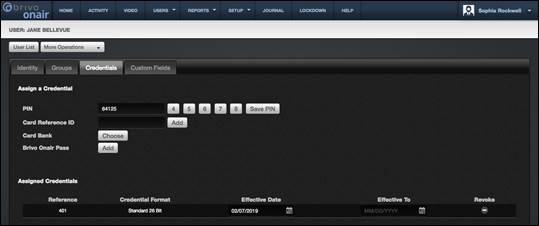
Figure 49. Create a User – Credentials Tab NEEDS TO
BE REPLACED
If your doors have keypads, enter a PIN. A PIN can be four- to eight-digits long. Click 4 ... to have the system generate a
random four-digit PIN, click 5 ...
for a five-digit PIN, etc.
Once you have selected a PIN,
click on the Save PIN button and the
PIN
will be added to the list of Assigned Credentials.
If your doors have card readers and you would like to:
Assign ONE card to a user: enter a card number in the blank
field next to Card Reference ID and
click Add or click Choose… to view a popup list of all
currently unassigned cards. Clicking on the desired card automatically adds the
card to the Assigned Credentials
list. Once finished adding a card, close the popup list to return to the Credentials tab.
Assign MULTIPLE cards to a user: enter a card number in the blank
field next to Card Reference ID and
click Add, repeating the process as
needed and adding up to 16 cards for that user. You may also click Choose… to view a popup list of all
currently unassigned cards. Clicking on the desired card automatically adds the
card to the Assigned Credentials
list. Once finished adding multiple cards, close the popup list to return to
the Credentials tab.
If you wish to use Brivo Mobile Pass functionality, click on the Add button next to the Brivo Mobile
Pass. The Add Brivo Mobile Pass popup window will appear. This popup window
shows the available number of Passes Available as well as a link for contacting
your dealer to request additional Brivo Mobile Passes.
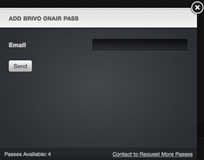
Figure 50. Add Brivo Mobile Pass NEEDS TO BE REPLACED
Enter the Email of the Brivo
Mobile Pass user in the field and click Send. A notification message will appear in the Add
Brivo Mobile Pass window with the following information.
·
Pass ID – This is the email address of
the Brivo Mobile Pass recipient.
·
Pass Code – A unique identifier which
expires after 72 hours if not redeemed.
·
Redeem By – This is the reminder date
and time that the email token will expire if not redeemed.
·
Click Link to Add Pass – This is a
deep link which can be copied into a browser on the user’s phone which will
allow them to use the Brivo Mobile Pass.
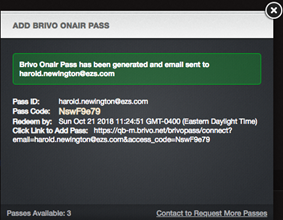
Figure 51. Add Brivo Mobile Pass Confirmation NEEDS
TO BE REPLACED
Until the user accepts and activates the Brivo Mobile Pass, the Brivo
Mobile Pass will list as Pending in
the Credentials tab. At any time prior to the activation of the Brivo Mobile
Pass, the administrator may click on the Cancel
Invite button to rescind the Brivo Mobile Pass invitation.
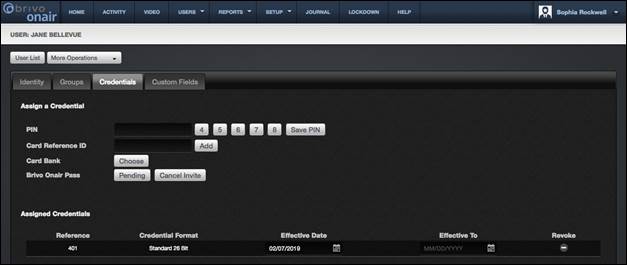
Figure 52. Brivo Mobile Pass Pending Acceptance NEEDS
TO BE REPLACED
Once the user has activated their Brivo Mobile Pass, the Brivo Mobile
Pass will then show as Active and be
listed under Assigned Credentials.
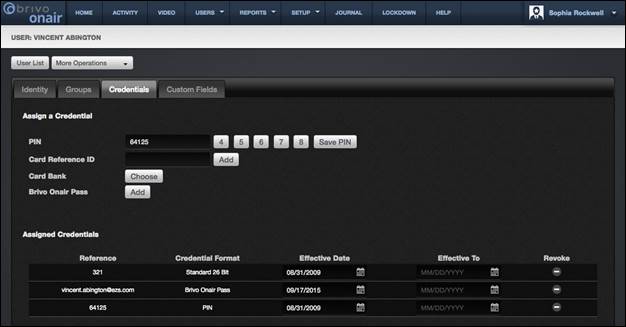
Figure 53. Active Brivo Mobile Pass NEEDS TO BE
REPLACED
|
|
NOTE: For more information on Brivo Mobile Pass, please consult the
appendix at the end of this manual and download the app from either the Apple
Store or Google Play Store. |
The Effective Date
defaults to today’s date. Change the date if the user’s access privileges
should take effect on a later date. The Effective
To field is empty by default. Click on the Effective To field to enter a date if the user’s access privileges
should expire on a pre-determined date; otherwise leave the field blank.
|
|
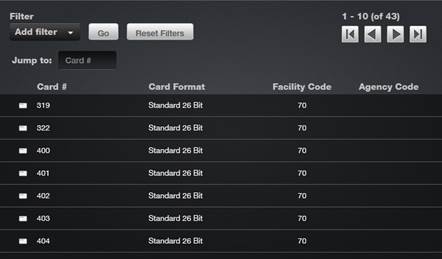
NOTE: It is possible to manually enter a card number in the Card Reference ID field. However, if
the card is not listed in the Card Bank, or if there are multiple cards with
the number you entered, you must click on Choose to specify which card has the corresponding facility code
you would like to add. |
|
|
NOTE: If any of the doors or elevators to which this user will have
access uses two-factor credentials, you must enter both a PIN and a Card #. |
Click on the Custom Fields tab
to move to the final step in Creating a User.
This tab displays custom fields (if any have been defined) for the
account. A custom field is a field that can be used for account-specific
purposes such as Employee Number or Telephone Extension. These fields are
optional and can be renamed to meet the needs of your organization. To rename a
custom field, click the Rename Custom
Field (See Managing Custom Fields for more information).
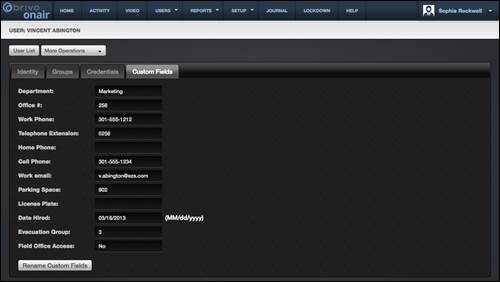
Figure 55. Create a User – Custom Field Tab
All information entered into the Identity, Groups, Credentials, and Custom Fields tabs is automatically saved. Once all data is
entered, the User profile is updated.
