Before you can use the Pelco DVR with Brivo
Onair you must first install the driver, available through the Brivo technical
support website at http://www.brivo.com/support/downloads.php. While installing the Pelco X-Portal driver,
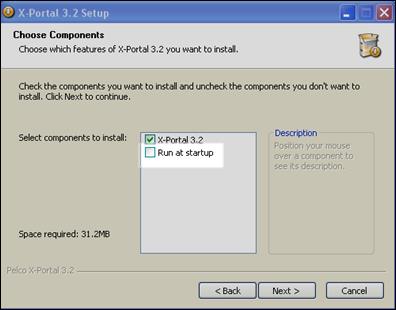
you must uncheck the “Run at startup” field.

Figure 171. Disable “Run at Startup”
After installing the driver, you must install the Pelco DVR X-Portal 3.2 Service Pack 3 available through the Brivo technical
support website at http://www.brivo.com/support/downloads.php.
Once you have installed the driver and service pack, login to the Brivo
Onair application and add the DVR according to the instructions in Adding a
DVR.
When configuring a Pelco DVR for Brivo Onair, users must keep in
mind that the DVR IP address is assigned by the
customer's network administration; the URL specified must be an IP address and not a host name, entered as http://<dvrIPaddress>:9002, where <dvrIPaddress> is the value specified in the Pelco DVR
manual.
Viewing footage on a Pelco DVR
requires the viewer to enter a specific user name and password per DVR on that account. If a user has
more than one Pelco DVR on an account, the user must have separate login
information per DVR. Additionally, only one user may enter a given username and
password at a time to view live video, and the user accounts on the DVR must be
created in the “Power User Group.” For more information on login names, please
refer to the Pelco DVR manual or your system administrator.
The Network Time Protocol (NTP) must
be configured on the DVR. Instructions for configuring NTP are available
in the DVR manual.