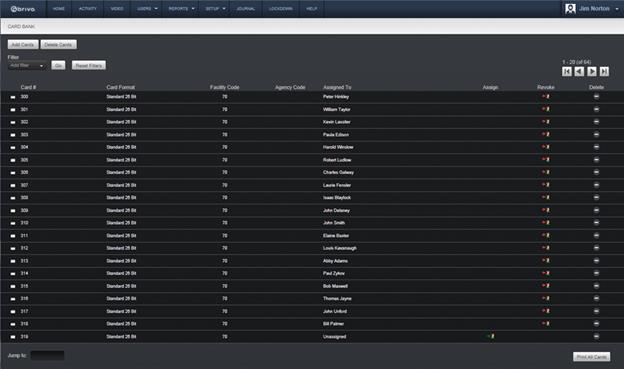
From the Setup dropdown
menu, choose the Cards tab then click
on the Card Bank tab. The Card Bank
page displays.

Figure 101. View the Card Bank
The Master Administrator and all Senior Administrators can
see all cards associated with an account. Assistant Administrators can see only
those cards assigned to users affiliated with groups for which they have Edit
permissions, and currently unassigned cards. Cards are listed in numeric order
on the Card Bank. For each card, the page displays the card format and the name
of the user to whom the card is currently assigned if applicable.
The following functions can be performed on this page:
To scroll forward through the list of cards,
click the right arrow in the top right corner. To scroll backward, click the
left arrow. To the left of the arrows, the system indicates which set of user
records you are currently viewing, for example, “1-20 (of 48).”
To Filter
the card bank by selecting from the dropdown menu. For example, to locate all cards
using “Standard 26 Bit” card format, select Card Format from the filter and
“Standard 26 Bit” from the options dropdown and click Go. The results will display
below.
Once a Filter
has been selected, the option exists to bulk delete cards in the Card Bank that
meet those filtered requirements using the Delete
All button that appears. A pop-up window appears asking for confirmation of
the deletion. To proceed with the bulk deletion, press OK.
To jump to a specific card, enter the card
number in the Jump to field located in the bottom left corner of the
page, and then press Enter.
Click Print All Cards in the bottom
right corner of the page to display a report of all cards in a popup window.
Click the name in the Assigned To field to access the detail page for a specific user.
Cards that are not currently assigned to a
user have a green arrow and an icon displayed in the Assign field. Click the icon and a pop-up window appears asking if
you wish to assign the card to a New
User or an Existing User. Click
on New User to access the New User
page, on which you can assign the card to a new user. Click on Existing User to call up a pop-up
window with the current User List. Click on the existing user to which you wish
to assign the card. The Edit User
page for that existing user appears with the selected card now added to the Added Cards field. Click Save User to complete the process. A
green message bar will appear across the top of your screen informing you that
the user profile has been edited.
Cards that are currently assigned to a user
have a red arrow and an icon displayed in the Revoke field. Click the icon to revoke a card for a user, making
the card unassigned, and possibly leaving the user without access privileges.
To delete an individual card from the Card
Bank, click the associated delete icon. If you delete a card currently assigned
to a user, that user loses access privileges.