1. From the Setup tab,
click on the Video tab then click on
DVRs. The DVRs list displays.
2. Click New DVR. The New
DVR page displays.
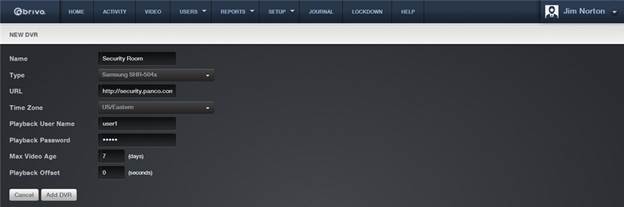
3. Enter a brief, descriptive Name
for the DVR. The name can be any convenient, alphanumeric designator for the
DVR. It does not need to agree with any naming established in the DVR itself,
as Brivo Onair only uses this reference internally.
4. From the Type dropdown
list click the type of digital video recorder you are adding.
5. You will need to contact your network administrator and/or DVR
administrator in order to determine the URL
of the DVR. Enter the URL in one of the following formats:
http://NNN.NNN.NNN.NNN (for a direct IP address)
http://dvr-name.subdomain.top-level-domain (if a DNS name has been established
for your DVR)
The URL may also contain additional information, such as port
numbers, for non-standard configurations.
6. From the dropdown list, click the Time Zone used by the DVR. For the DVR feature to work properly,
the value selected from this list must mirror the time zone setting for the
DVR.
7. For some DVRs, a Playback
User Name and Playback Password
are required which can be entered into the corresponding fields.
8. In the Max Video Age (days)
field, enter the number of days for which the DVR has been configured to store
data. Brivo Onair uses this information to control its display of information
on the Activity Log.
9. If there is a time difference between the clock on the DVR and the
clock on the Control Panel, enter that difference in the Playback Offset (seconds) field. For example, if the Control Panel
clock is five seconds slower than the DVR clock, enter -5. If the Control Panel clock is ten seconds faster, enter 10.
10. If using a Speco CS/GS/LS/PS model, the option to use DVRNS is available. To do so, simply
check the DVRNS checkbox. Additionally, enter the Watch Port Number and Seek
Port Number.
11. Click Save DVR. You are
returned to the DVRs list with the new DVR listed in alphabetical order.