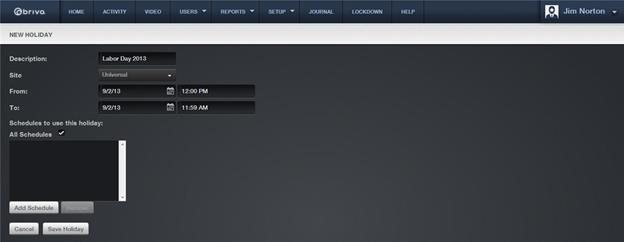
1. From the Setup dropdown
menu, choose the Schedules tab then
click the New Holiday tab. The New
Holiday page displays.

2. Enter a brief, meaningful Description
for the holiday, such as “Veteran’s Day” or “Summer Fridays.”
3. You can create holidays to be used by the entire account or by
individual sites. If you want this holiday to apply only to a specific site,
click that option on the Site
dropdown list. Otherwise accept the default, Universal.
4. In the From and To fields, enter the time period during
which the holiday is in effect.
5. Click the checkbox for All
Schedules if you want all schedules to observe this holiday. Otherwise,
click the Add Schedule link below
and the available schedules popup window will appear. Click on the schedules
you want to follow this holiday. They will disappear from the popup window and
appear on the new holiday page in the schedule box. When finished selecting
schedules, click the Close Window link
and you are returned to the New Holiday page. This list includes all schedules
currently defined for the account. To remove a schedule, highlight the schedule
in the box and click Remove.
6. Click Save. The Holiday
List displays with the new holiday listed.