1. If you are not already on the Edit Permissions screen from having
just created a new Administrator:
2. From the Setup tab,
choose the Account tab then click on
the Administrators tab. The
Administrator directory displays.
3. Click the Assistant Administrator you wish to edit. The
Administrator detail page displays.
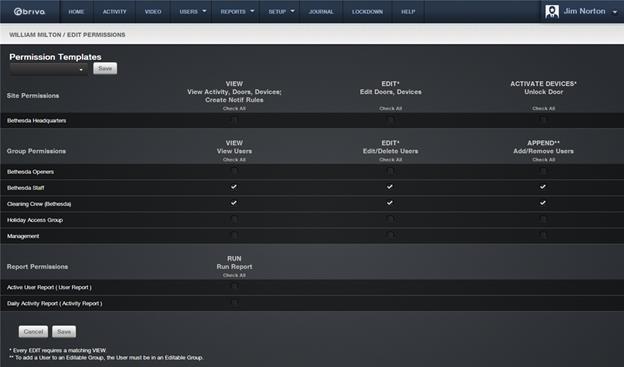
4. Click Edit Permissions. The Edit Permissions page displays,
showing only that information to which you have access and for which you have
permission to make changes.

Figure 96. Edit Assistant Administrator Permissions
Site Permissions
1. To grant an Assistant Administrator permission to view site-specific data, click the View
box associated with the desired site(s).
2. To grant an Assistant Administrator permission to edit site-specific data, click the Edit
box associated with the desired site(s).
3. To grant an Assistant Administrator permission to activate devices for specific sites,
click the Activate Devices box
associated with the desired site(s).
Group Permissions
1. To grant an Assistant Administrator permission to view users in a specific group, click
the View box associated with the desired group(s).
2. To grant an Assistant Administrator permission to edit users in a specific group, click
the Edit box associated with the desired group(s). Again, when the Edit
box is clicked, the View box is automatically selected as well.
3. To grant an Assistant Administrator permission to add and remove users from a specific
group, click the Append box associated with the desired group(s).
|
|
NOTE: Understanding the following relationships between the checkboxes
will make it easier for you to manage permissions on this page. o Click Check All at the top of any column to check that level of access
for all listed sites or groups. o Check All is not a
toggle. It cannot be used as an Uncheck All option. o When Edit is clicked, View automatically becomes
selected as well. o If Edit and View are both checked, de-selecting View automatically de-selects Edit as well. o De-selecting Edit does not automatically de-select View. o Clicking Append does
not affect View and Edit in any way. |
Report Permissions
1. To grant an Assistant Administrator permission to run a specific report, click the Run box associated with the desired
report.
2. Click Save.
3. If you are creating a new Assistant Administrator, verify the
permissions you’ve assigned. First, record the ID and password created for the
new Administrator, then log off and log back in using that ID and password.
This lets you experience the interface from the Administrator’s perspective. If
necessary, log back in as yourself and edit the permissions using the steps outlined
above
|
|
NOTE: Assistant Administrators can only run existing reports. They cannot create their own reports, edit
existing reports, or delete existing reports.
Additionally, Assistant Administrators cannot be assigned permissions
to run reports marked as private. |
|
|
NOTE: Assistant Administrator’s reports may be different than what the
Senior/Super/Master Administrator sees. o The Assistant Administrator will not
see any deleted users in a user report. o The Assistant Administrator will not
see any users in groups he/she does not have permission to in user reports. o The Assistant Administrator will not see any activity for sites
he/she does not have permission to in activity reports. o If a user report contains the Group Name user field, the Assistant Administrator will not see
any groups he/she does have permission to. o If a user report contains the PIN user field, the Assistant Administrator will see a masked PIN
if the Assistant Administrator cannot edit that user. |
