From the Setup dropdown
menu, choose the Sites/Doors tab
then click the Audio Devices tab. You are taken to the Brivo Login page.
Enter your administrator ID and password and click the Log in button. The Audio Device List displays.
Click on the Define button
for the Audio Device to which you wish to add a directory rule. The Edit
Directory Rule page displays.
Click on the Add Rule
button at the top of the page.

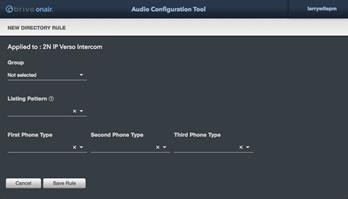
Figure 184. Add a Directory Rule
From the dropdown list, select the Group to which this rule will be applied.
|
|
NOTE: Before creating users in Brivo Onair
to add to the 2N IP Verso Intercom directory, you MUST already have
(or need to create) a single group in Brivo Onair to which all of these users
will belong (for example, Front Lobby Intercom Group). |
You may enter a new listing pattern in the Listing Pattern field or if you already have listing patterns
defined, you may select the Listing
Pattern from the dropdown list that this rule will follow. See the Listing
Patterns section above for more details on creating new listing patterns.
Choose the First Phone
Type, Second Phone Type, and Third
Phone Type that the Audio Device will try to contact when contacting a call
recipient. These phone types are drawn from the user profiles in Brivo Onair.
|
|
NOTE: In order for the 2N IP Verso unit to
be able to ingest phone numbers from Brivo Onair, the phone number MUST
include a country code. For phone numbers in the United States and Canada,
this means including a 1 before the ten-digit phone number. DO NOT use
dashes when entering phone numbers. |
|
|
NOTE: It is recommended that the timeout for
each phone number be set to no longer than 15 seconds in the 2N IP Verso
interface. Most cell phones go to voice mail after approximately 30 seconds.
Setting the timeout to 15 seconds ensures that the 2N IP Verso intercom will
roll over to the second or third phone numbers rather than disconnecting. |
Click Save Rule. You
are returned to the Audio Device List page.
