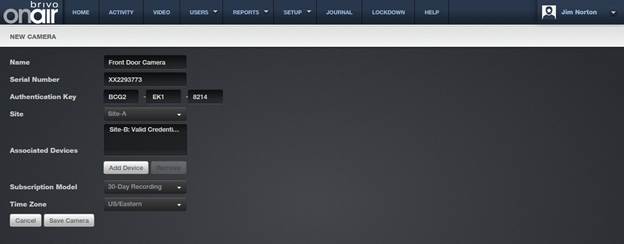
1. From the Setup tab,
click on the Video tab, then choose the
OVR tab. The OVR Camera list page
appears.
2. Click on the New Camera
link at the top of the page. The New Camera page displays.
3. Enter a Name for the
camera you wish to register.

Figure 12. Register an OVR Camera
4. Enter the Serial Number and
the Authentication Key provided for
the camera.
5. Select the Site for the
camera from the dropdown menu.
6. Select an Associated Device
to link the camera with. Click on the Add
Device link. A popup window will appear with all available devices, which
can be filtered as necessary. When selected, the device will disappear from the
list. Scroll to the bottom of the list and click Close Window when you are finished.
7. Select the Subscription Model
from the dropdown menu.
|
|
NOTE: Once selected, the subscription model cannot be changed locally.
If the subscription model needs to be changed, call your dealer. |
8. Select the Time Zone
from the dropdown menu.
9. Click Save Camera at
the bottom of the page. You are taken to the Edit Camera page.
|
|
NOTE: The system automatically detects the camera model by the serial
number and authentication key entered. |
10. The Brightness, Color, and Contrast fields may be edited (the default is 50).
11. The Rotation (the
default is 0) of the camera can be changed.
12. To edit the White Balance
(the default is automatic), click on the dropdown list and make a selection.
13. The Motion Sensitivity, Motion History, and Motion Object Size may
be edited (the defaults are 90, 70, and 15 respectively).
14. Click Save Camera at
the bottom of the page. You are redirected to the View Camera page.
